
Frag vor dem Öffnen eines RCs die wichtigsten Infos ab – Beteiligte, Rennen, Hergang, Clips – und hol die beteiligten Fahrer direkt mit in den Kanal. In Discord heißen diese Fenster „Modals“.
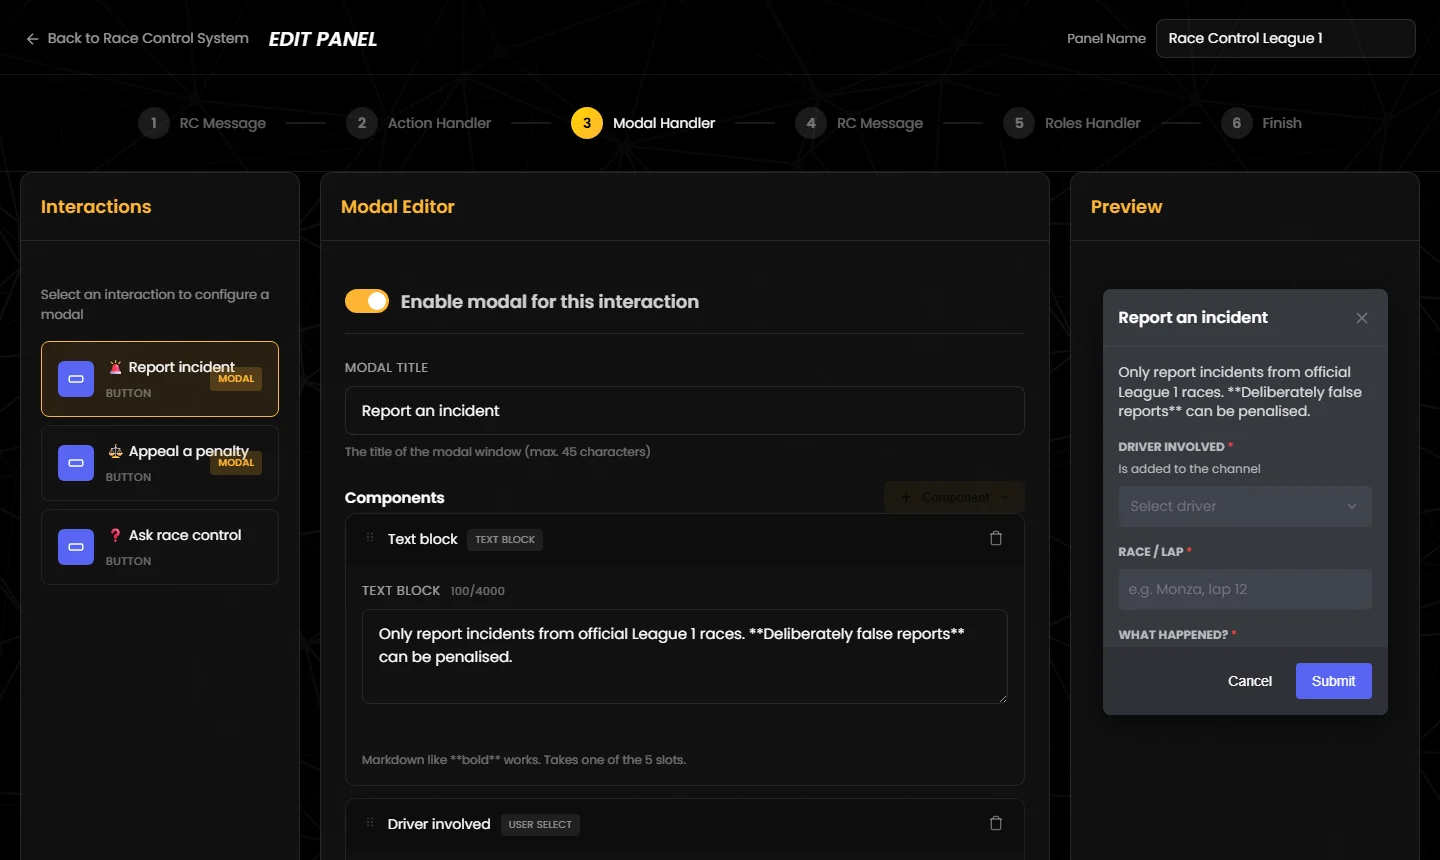
Ask for the key details before an RC is opened – drivers involved, race, what happened, clips – and bring the drivers involved straight into the channel. Discord calls these windows “modals”.
Klickt ein Fahrer auf einen Button (oder wählt eine Option), zeigt Discord ein Fenster mit Eingabefeldern. Erst nach „Absenden“ legt der Bot das RC an; die Antworten stehen dann im RC-Kanal. Schließt der Fahrer das Fenster, passiert nichts – es entsteht kein RC.
Jede Interaktion kann ihr eigenes Formular haben. So fragt „Vorfall melden“ nach dem beteiligten Fahrer und dem Hergang, während „Strafe anfechten“ nach der Strafe und einer Begründung fragt.
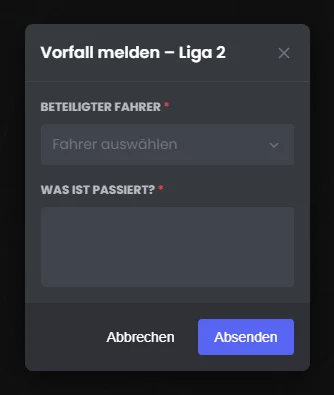
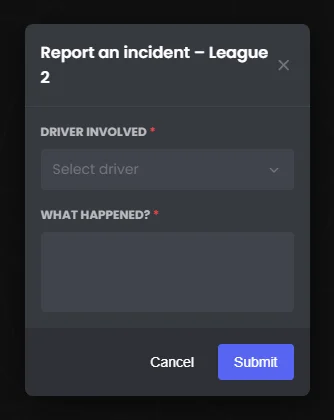
When a driver clicks a button (or picks an option), Discord shows a window with input fields. Only after “Submit” does the bot create the RC; the answers then appear in the RC channel. If the driver closes the window, nothing happens – no RC is created.
Every interaction can have its own form. “Report incident” might ask for the driver involved and what happened, while “Appeal a penalty” asks for the penalty and a reason.
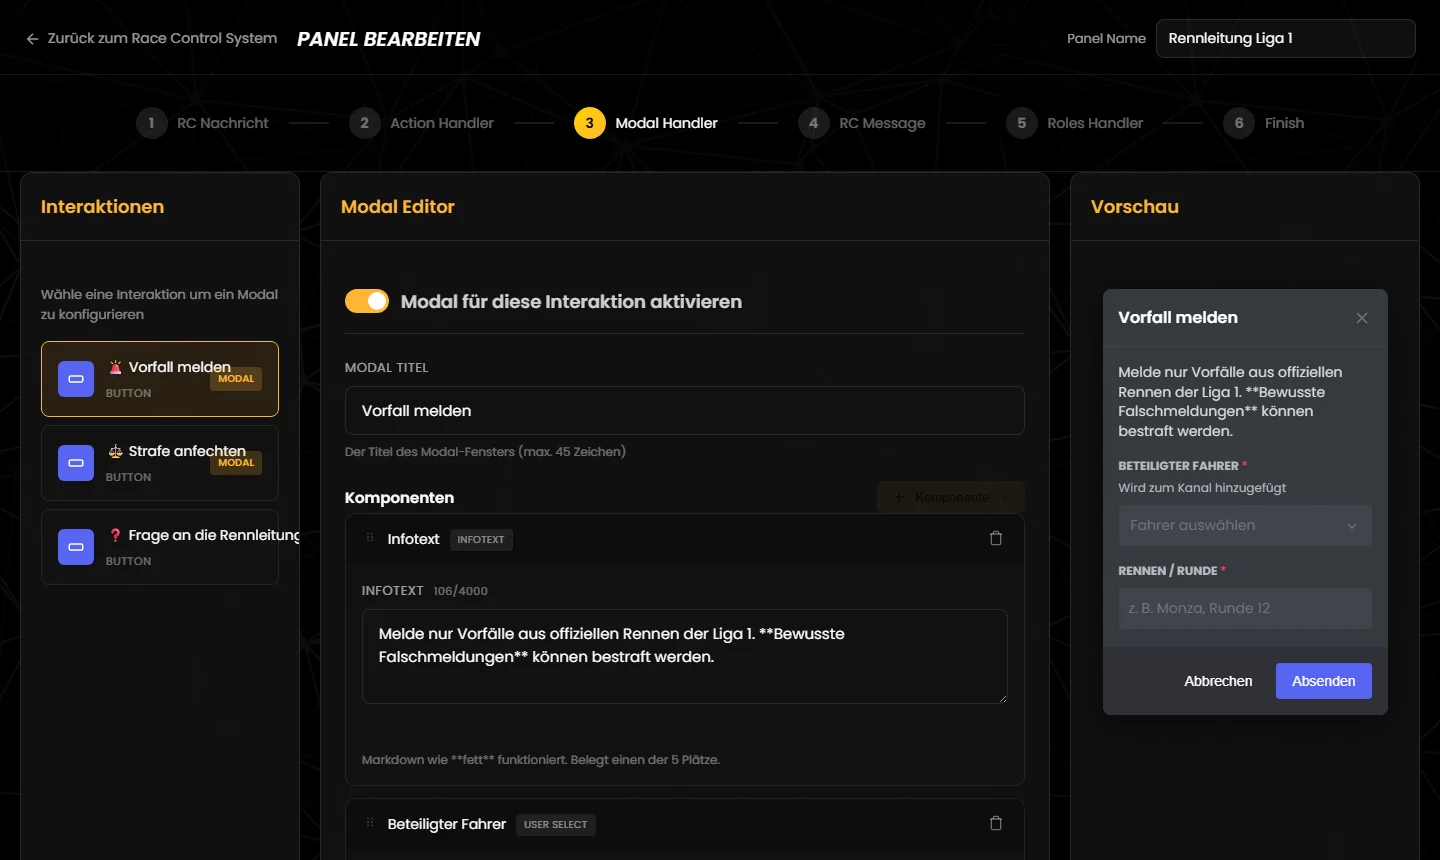
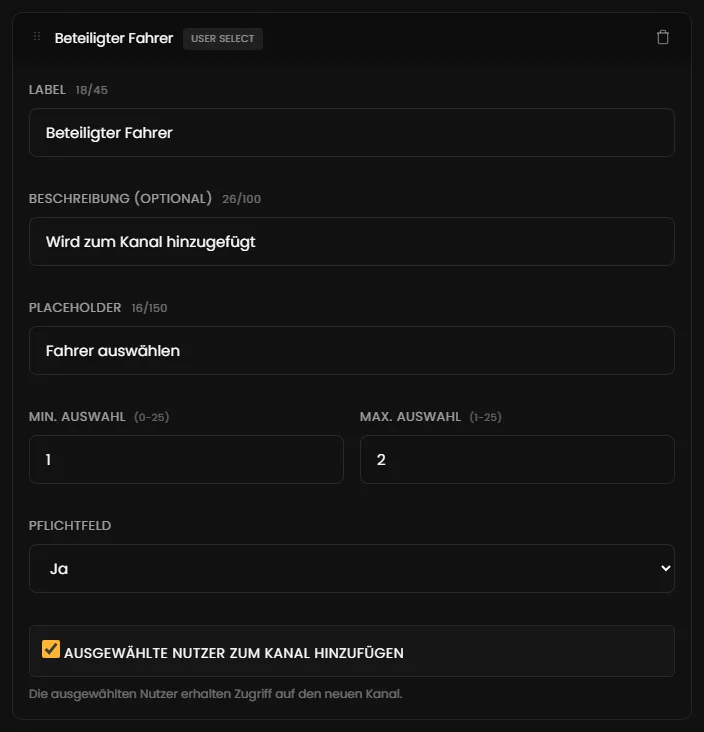
Das gibt es nur bei Race Control: Ein User Select Menu hat zusätzlich den Haken „Ausgewählte Nutzer zum Kanal hinzufügen“. Ist er gesetzt, bekommen alle Mitglieder, die der Meldende in diesem Feld auswählt, Zugang zum neuen RC-Kanal. So kann der beteiligte Fahrer direkt Stellung nehmen, und die Rennleitung muss niemanden von Hand hinzufügen.
Sie sehen den neuen Kanal in ihrer Kanalliste. Außerdem stehen sie als Erwähnung in den Formular-Antworten der Willkommensnachricht. Beim Nachrichtentyp „Nachricht“ löst diese Erwähnung eine Benachrichtigung aus; in einem Embed nicht – dort sind Erwähnungen in Discord stumm.
Tipp: Soll der Beteiligte sicher angepingt werden, nimm für die Willkommensnachricht den Typ „Nachricht“ – oder setze in einer eigenen Nachricht den Platzhalter {modal:Beteiligter Fahrer} in den Text.
Der Meldende entscheidet, wer hinzukommt. Discord bietet im Feld alle Mitglieder des Servers an. Schränke die Auswahl über „Max. Auswahl“ ein, zum Beispiel auf 1 oder 2, und prüft beim Übernehmen kurz, ob wirklich die Richtigen im Kanal sind. Den Haken gibt es nur beim User Select Menu, nicht bei Role Select oder Mentionable Select.
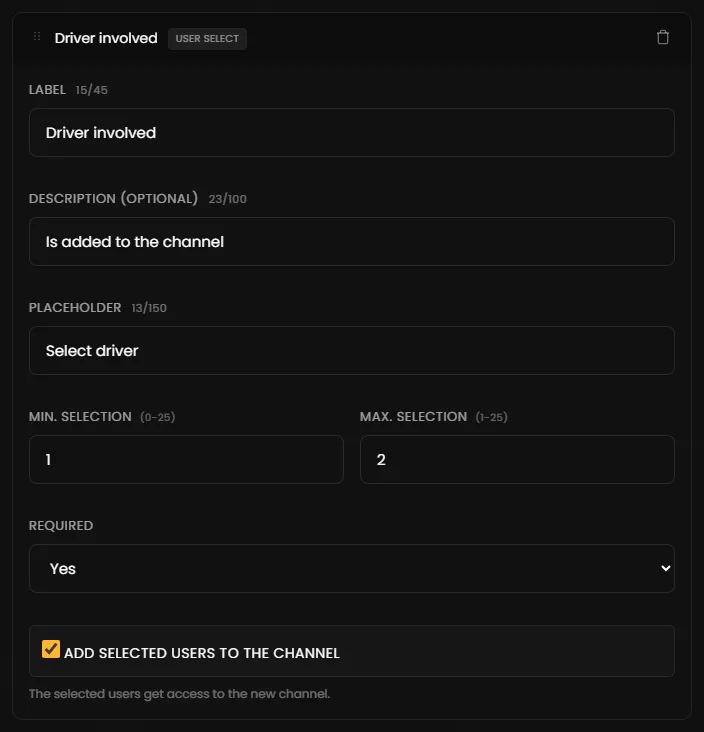
This only exists in race control: a User Select Menu has the extra tick box “Add selected users to the channel”. If it is ticked, every member the reporting driver picks in this field gets access to the new RC channel. That way the driver involved can give their side right away, and your stewards do not have to add anyone by hand.
They see the new channel in their channel list. They are also mentioned in the form answers of the welcome message. With the “Message” type this mention triggers a notification; in an embed it does not – mentions in embeds are silent in Discord.
Tip: if the driver involved should definitely be pinged, use the “Message” type for the welcome message – or put the placeholder {modal:Driver involved} into the text of a dedicated message.
The reporting driver decides who joins. Discord offers every member of the server in the field. Limit the choice with “Max. selection”, for example to 1 or 2, and have your stewards quickly check on claiming that the right people are in the channel. The tick box only exists on the User Select Menu, not on Role Select or Mentionable Select.
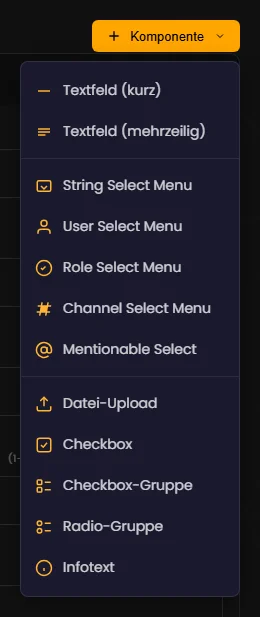
Jedes Formular hat höchstens fünf Felder. Diese Typen stehen zur Wahl:
Eine Zeile, etwa für „Rennen / Runde“. Einstellbar: Placeholder (bis 100 Zeichen), Min. und Max. Zeichen (0–4000, Standard höchstens 100) und ein vorbelegter Text. Antwort: der eingegebene Text.
Ein großes Feld für den Hergang oder eine Begründung. Dieselben Einstellungen wie das kurze Textfeld, Standard höchstens 4000 Zeichen. Antwort: der eingegebene Text.
Eine Auswahlliste mit eigenen Optionen (bis 25), etwa die Art der Strafe. Jede Option hat ein Label (bis 100 Zeichen) und optional ein Emoji, eine Beschreibung und eine Vorauswahl. Dazu Min. und Max. Auswahl (0–25 bzw. 1–25) und ein Placeholder. Ein neues Feld startet ohne Optionen. Antwort: die Labels der gewählten Optionen, mit Komma getrennt.
Auswahl von Servermitgliedern, etwa „Beteiligter Fahrer“. Einstellbar: Placeholder, Min. und Max. Auswahl und der Haken „Ausgewählte Nutzer zum Kanal hinzufügen“. Antwort: Erwähnungen der gewählten Mitglieder. Zugang zum RC-Kanal bekommen sie nur mit dem Haken, siehe oben.
Auswahl von Server-Rollen, etwa „In welcher Liga fährst du?“. Einstellbar: Placeholder, Min. und Max. Auswahl. Antwort: die gewählten Rollen als Erwähnung.
Auswahl von Kanälen. Unter „Kanaltypen“ grenzt du ein: Text, Sprache, Kategorie, Ankündigung, Stage, Forum – keiner gewählt heißt alle. Antwort: Links zu den gewählten Kanälen.
Auswahl von Mitgliedern oder Rollen in einem Feld. Einstellbar: Placeholder, Min. und Max. Auswahl. Antwort: Erwähnungen, erst Mitglieder, dann Rollen. Zum Kanal hinzufügen lassen sich die Gewählten hier nicht.
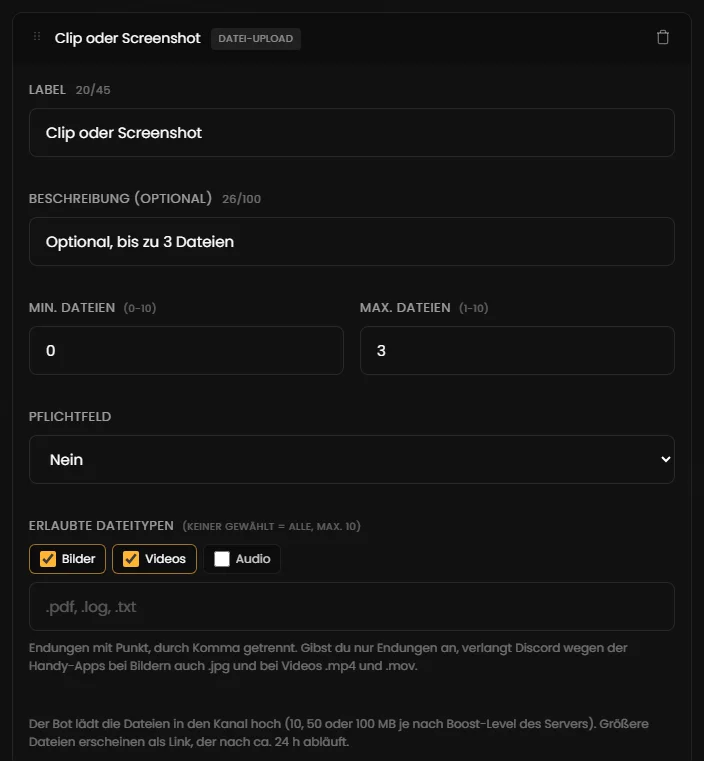
Fahrer hängen Dateien an, etwa Screenshots oder kurze Clips. Einstellbar: Min. und Max. Dateien (0–10 bzw. 1–10) und die erlaubten Dateitypen – Bilder, Videos, Audio und/oder Endungen wie .pdf oder .txt (höchstens 10; keiner gewählt heißt alle). Antwort: die Dateinamen; die Dateien selbst postet der Bot direkt nach der Willkommensnachricht. Mehr zu Uploads
Ein einzelnes Häkchen, zum Beispiel „Ich habe ein Replay gespeichert“. Einstellbar: „Vorab angehakt“. Eine einzelne Checkbox kann Discord nicht zur Pflicht machen. Antwort: „✅ Ja“ oder „❌ Nein“.
Mehrere Häkchen zur Auswahl (bis 10 Optionen), etwa die betroffenen Sessions. Einstellbar: Min. und Max. Auswahl (0–10 bzw. 1–10), Vorauswahl je Option. Antwort: die Labels der angehakten Optionen.
Genau eine Antwort aus 2 bis 10 Optionen, etwa „Qualifying“ oder „Rennen“. Höchstens eine Option darf vorausgewählt sein. Antwort: das Label der gewählten Option.
Ein Hinweistext ohne Eingabe, bis 4000 Zeichen, Markdown wie **fett** funktioniert. Gut für Meldefristen oder Regeln vor dem Ausfüllen. Belegt einen der fünf Plätze. Antwort: keine.
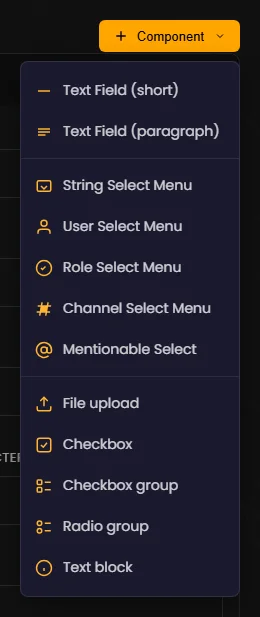
Each form has at most five fields. These types are available:
A single line, for example for “Race / lap”. Settings: placeholder (up to 100 characters), min. and max. characters (0–4,000, by default at most 100) and pre-filled text. Answer: the text entered.
A large field for what happened or a reason. Same settings as the short text field, by default up to 4,000 characters. Answer: the text entered.
A drop-down with your own options (up to 25), for example the type of penalty. Each option has a label (up to 100 characters) and, optionally, an emoji, a description and a preselection. Plus min. and max. selection (0–25 and 1–25) and a placeholder. A new field starts without options. Answer: the labels of the chosen options, separated by commas.
Pick server members, for example “Driver involved”. Settings: placeholder, min. and max. selection and the tick box “Add selected users to the channel”. Answer: mentions of the chosen members. They only get access to the RC channel with the tick box, see above.
Pick server roles, for example “Which league do you race in?”. Settings: placeholder, min. and max. selection. Answer: the chosen roles as mentions.
Pick channels. Under “Channel types” you can narrow it down: Text, Voice, Category, Announcement, Stage, Forum – none selected means all. Answer: links to the chosen channels.
Pick members or roles in one field. Settings: placeholder, min. and max. selection. Answer: mentions, members first, then roles. The chosen members cannot be added to the channel here.
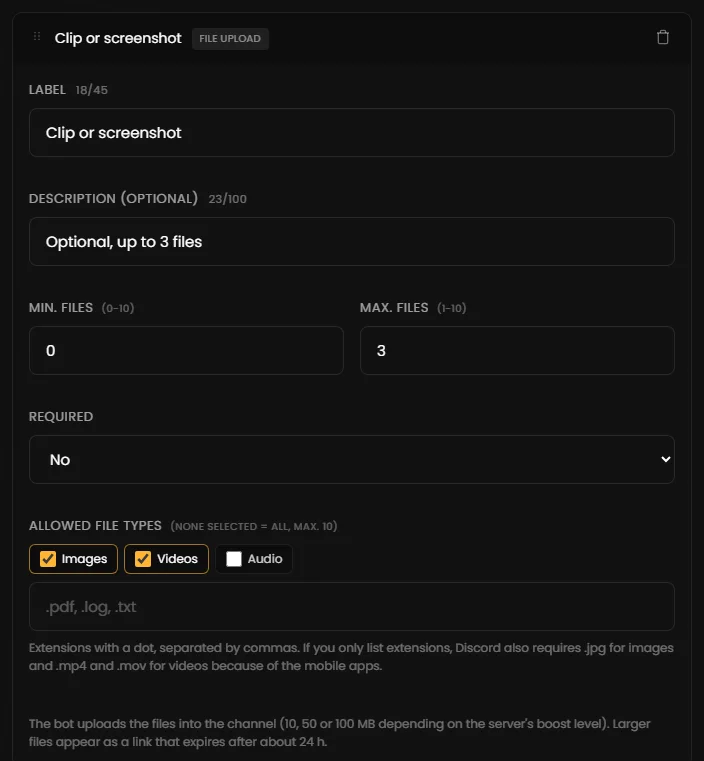
Drivers attach files, for example screenshots or short clips. Settings: min. and max. files (0–10 and 1–10) and the allowed file types – images, videos, audio and/or extensions such as .pdf or .txt (at most 10; none selected means all). Answer: the file names; the bot posts the files themselves right after the welcome message. More on uploads
A single tick box, for example “I have saved a replay”. Setting: “Checked by default”. Discord cannot make a single checkbox required. Answer: “✅ Yes” or “❌ No”.
Several tick boxes (up to 10 options), for example the sessions concerned. Settings: min. and max. selection (0–10 and 1–10), preselection per option. Answer: the labels of the ticked options.
Exactly one answer out of 2 to 10 options, for example “Qualifying” or “Race”. At most one option may be preselected. Answer: the label of the chosen option.
An information text without input, up to 4,000 characters; Markdown like **bold** works. Good for reporting deadlines or rules before filling in. Takes one of the five slots. Answer: none.
| Einstellung | Bedeutung |
|---|---|
| Label Pflicht | Der Feldname über dem Eingabefeld, bis 45 Zeichen. Er muss im Formular eindeutig sein, denn über ihn setzt du die Antwort mit {modal:Label} in Nachrichten ein. |
| Beschreibung (optional) | Ein kurzer Hinweis unter dem Feldnamen, bis 100 Zeichen – gut für Beispiele. |
| Pflichtfeld | „Ja“ (Standard) oder „Nein“. Pflichtfelder tragen in Discord ein rotes Sternchen. Beim Datei-Upload und bei der Checkbox-Gruppe hängt „Pflicht“ am Minimum: Pflicht heißt mindestens 1. Checkbox und Infotext haben keine Pflicht-Einstellung. |
| Setting | Meaning |
|---|---|
| Label required | The field name above the input, up to 45 characters. It must be unique within the form, because you insert the answer into messages with {modal:Label}. |
| Description (optional) | A short hint below the field name, up to 100 characters – good for examples. |
| Required | “Yes” (default) or “No”. Required fields have a red asterisk in Discord. For file uploads and checkbox groups, “required” is tied to the minimum: required means at least 1. Checkbox and text block have no required setting. |
{modal:Feldname} selbst ein, zum Beispiel {modal:Rennen / Runde}. Der Name muss genau dem Label entsprechen.Beispiel – Typ „Nachricht“ mit ausgefülltem Formular:
.jpg und bei Videos .mp4 und .mov.Lange Clips: Onboard-Videos sind schnell größer als 10 MB. Frag dafür lieber zusätzlich einen Link ab (zum Beispiel YouTube oder Medal) – als kurzes Textfeld „Link zum Clip“.
{modal:Field name}, for example {modal:Race / lap}. The name must match the label exactly.Example – “Message” type with a filled-in form:
.jpg for images and .mp4 and .mov for videos because of the mobile apps.Long clips: onboard videos quickly exceed 10 MB. Ask for a link as well (for example YouTube or Medal) – as a short text field “Link to the clip”.
Der Editor prüft jedes Formular, bevor du speichern kannst. Probleme erscheinen in Schritt 6 als „Modal für "…": …“. In den Anführungszeichen steht die interne Kennung der Interaktion (etwa rc_btn_… oder opt_…), nicht die Beschriftung. Die häufigsten Meldungen:
| Meldung | Lösung |
|---|---|
| Ein Modal kann höchstens 5 Felder haben. | Ein Feld entfernen; Infotexte zählen mit. |
| Feld N hat keinen Feldnamen. | Ein Label eintragen. |
| Feldname „X“ kommt doppelt vor … | Eines der Felder umbenennen, damit {modal:X} eindeutig ist. |
| Feld N hat keine Optionen. | Mindestens eine Option anlegen (Auswahlliste, Checkbox-Gruppe). |
| Radio-Gruppe (Feld N) braucht mindestens 2 Optionen. | Eine zweite Option anlegen. |
| Feld N: Min. Auswahl (a) ist größer als die Zahl der Optionen (b). | Minimum senken oder Optionen ergänzen. |
| Feld N: Min. Zeichen (a) ist größer als Max. Zeichen (b). | Grenzen tauschen oder anpassen. |
| Vorbelegter Text von Feld N ist länger als Max. Zeichen … | Vorbelegten Text kürzen oder Maximum erhöhen. |
| Feld N: Emoji von Option O ist ungültig … | Ein einzelnes Emoji wie 🚨 oder ein Server-Emoji im Format <:name:id> verwenden. |
| Feld N: Dateityp „x“ ist ungültig … | Nur Bilder, Videos, Audio oder Endungen wie .pdf angeben, höchstens 10. |
| Radio-Gruppe (Feld N) erlaubt nur eine Vorauswahl. | Bei allen außer einer Option die Vorauswahl entfernen. |
Nur Warnungen (Speichern möglich) sind: ein Formular ohne Titel und ein eingeschaltetes Formular ohne Felder.
The editor checks every form before you can save. Problems appear in step 6 as “Modal "…": …”. The quotes contain the internal ID of the interaction (such as rc_btn_… or opt_…), not its label. The most common messages:
| Message | Fix |
|---|---|
| A modal can have at most 5 fields | Remove a field; text blocks count too. |
| Field N has no label | Enter a label. |
| Label "X" is used twice (fields A and B) | Rename one of the fields so that {modal:X} is unique. |
| Field N has no options | Add at least one option (select menu, checkbox group). |
| Radio group (field N) needs at least 2 options | Add a second option. |
| Field N: min values is greater than the number of options | Lower the minimum or add options. |
| Field N: min length is greater than max length | Swap or adjust the limits. |
| Pre-filled text of field N is longer than its max length | Shorten the pre-filled text or raise the maximum. |
| Field N: emoji of option O is invalid | Use a single emoji like 🚨 or a server emoji in the format <:name:id>. |
| Field N: invalid file type | Only use images, videos, audio or extensions like .pdf, at most 10. |
| Radio group (field N) allows only one default | Remove the preselection from all options but one. |
Only warnings (saving still possible) are: a form without a title and a form that is switched on but has no fields.
{modal:Strafe} einsetzen.{modal:Penalty}.Tritt unserem Discord-Server bei – das Team hilft dir bei der Einrichtung gerne weiter.
Join our Discord server – the team is happy to help you with the setup.